Wednesday, December 15, 2010

White Chocolate Truffle Pecan Drop Cookies

These are my favorite cookies of all time. I don't know what it is about them...possibly the fact that the toasted pecans meld so beautifully with the other ingredients. Or, that there are obscenely large chunks of white chocolate truffles that give them an almost reflective quality that every "chip" cookie should have, in my humble opinion. They are decadent. When Don found out that I was giving these away he gave me a look that was so confused...as if he couldn't fathom why I would do that to him. Seriously, they're so, so good. You know what? I'll just let them speak for themselves. Make them!! Here's some incentive:


Here's the recipe, and do yourself a favor and toast the pecans. There's nothing in this world like the smell of toasted pecans. It should be illegal. Besides, when you toast nuts, it releases their flavor. Flavor is always good.

Ingredients:
  • 1 1/2 cups of flour
  • 1/2 tsp. of baking soda
  • 1/2 tsp. salt
  • 2/3 cup (1 1/3 sticks) unsalted butter, softened (I used salted butter, they turned out fine)
  • 1/2 cup sugar
  • 1/2 cup firmly packed light brown sugar
  • 1 large egg, at room temp (if you forget, you can still use one out of the fridge, but your cookies won't have as much volume. Try putting the egg in a warm cup of water for a while.)
  • 1 tsp. vanilla extract
  • 1 cup coarsely chopped toasted pecans (see Note)
  • 2/3 cup coarsely chopped white chocolate truffle (preferably Lindt, in bar form)
Note: to toast pecans, place on a baking sheet in a 350-degree oven for about 15 minutes, or until lightly browned. When they start smelling like they're done, they're done. It's easy to burn these babies.

Preheat oven to 350 degrees.
In a small bowl, combine the flour, baking soda, and salt. Set aside.
In a large bowl cream the butter with the sugars until smooth, about two minutes. Add the egg and vanilla, and beat well. Add the dry ingredients and mix thoroughly. Stir in the pecans and white chocolate. Drop by rounded teaspoonfuls into ungreased cookie sheets, leaving several inches between for expansion. Bake for 10 to 12 minutes,or until lightly golden. Cool the cookies on the sheets for 5 minutes, and then remove to a wire rack to cool completely. Then inhale. I won't tell if you do, I'm pretty sure I ate at least half a dozen.

Classic Gingerbread


This recipe will allow to you make a house and at least a dozen and a half cookies as well. It takes some elbow grease to get the flour kneaded in, but the finished product is soft enough to be extremely tempting, but firm enough to construct a house out of.

Ingredients

1 cup butter, softened
1 cup brown sugar
1-1/3 cups molasses
4 eggs
8 cups all-purpose flour, divided
1 teaspoon baking soda
1 teaspoon salt
1 teaspoon ground allspice
1 teaspoon ground cloves
1 teaspoon ground cinnamon
1 teaspoon ground ginger
2 pounds confectioners' sugar
1 teaspoon cream of tartar
6 egg whites

Directions

1. Preheat oven to 350 degrees F (175 degrees C).
2. In a large bowl, cream together the butter and brown sugar until smooth. Stir in the molasses and eggs. Combine 1 1/2 cups of the flour, baking soda, salt, allspice, cloves, cinnamon, and ginger; beat into the molasses mixture. Gradually stir in the remaining flour by hand to form a stiff dough. Divide dough into 2 pieces.
3. On a lightly floured surface, roll out dough to 1/8 inch thickness. Cut into desired shapes. Place pieces 1 inch apart onto parchment-lined cookie sheets. Refrigerate for 15 minutes. Bake for 8 to 10 minutes in the preheated oven. Cool on baking sheet for 5 minutes before removing to a wire rack to cool completely.

Icing
In a medium bowl, sift together confectioners' sugar and cream of tartar. Blend in egg whites. Using an electric mixer on high speed, beat for about 5 minutes, or until mixture is thick and stiff. Keep covered with a moist cloth and plastic wrap until ready to decorate.

Friday, October 8, 2010

Duck Stew


Don went duck hunting this weekend. He did so well that he shot the allotted number of ducks he was allowed to--seven. This led me to a bit of a predicament. I didn't know what to do with one duck, let alone seven. Plus, the only time I've ever had duck was at a Chinese food restaurant, and I wasn't too impressed with it. However, this turned out pretty good. So, in case you're like me, and have an excess of duck, or are merely curious about the friendly fowl, here's the recipe:

Duck Stew:

Ingredients

  • 1 tablespoon olive oil
  • 4-5 duck breasts cut up, marinated over night in 2 TBSP Worcestershire sauce, salt & pepper
  • Salt
  • Freshly ground black pepper
  • 1 cup all-purpose flour
  • 2 cups chopped onions
  • 1 cup chopped carrots
  • 1 cup chopped celery
  • 1 cup sliced mushrooms
  • 1 tablespoon tomato paste
  • 2 TBSP dry red wine (optional)
  • 2 bay leaves
  • 2 cloves minced garlic
  • 4 cups beef broth
  • 2 cups water
  • 1 pound white potatoes, peeled and diced into 1/4-inch thick cubes
  • 3 sprigs of fresh thyme/rosemary/etc.

Directions

In a large saucepan, over medium heat, add the oil. Season the duck pieces with salt and pepper. Place the flour in a mixing bowl. Season the flour with salt and pepper. Dredge the duck pieces in the seasoned flour. When the oil is hot, add the duck pieces, fat side down and sear for 6 minutes. Turn the pieces over and continue to sear for 4 minutes. Remove the duck from the pan and set aside. Add the onions, carrots, and celery. Season the vegetables with salt and pepper. Saute the vegetables until wilted, about 4 minutes. Stir in the tomato paste. Remove vegetables. Deglaze the pan with the red wine. With a wooden spoon, scrape the sides and bottom of the pan to loosen any brown particles. Stir in the garlic, duck stock and water. Add the potatoes, reserved duck pieces, and thyme. Bring the liquid to a boil and reduce to a simmer. Simmer for about 3 hours, covered, stirring occasionally or until the meat falls off the bones. Add the rest of the vegetables 1/2 an hour before end time. Remove from the heat and stir in the parsley. Ladle into shallow bowls and serve with crusty bread.

Thursday, July 1, 2010

Minted Honey-Lime Fruit Salad


This is my favorite fruit salad. This salad is really easy, and perfect for any 4th of July celebration you might be planning. And the sauce makes every morsel taste like candy. Plus, the combination of honey and lime is reminiscent of Brazil, where they believe every fruit can be improved with those two things. And I'm thinking that anything that's reminiscent of Brazil is good.:)


Minted Honey-Lime Fruit Salad

Ingredients:
  • 1 tsp.grated lime peel
  • 2 TBSP lime juice (side note: if you roll the lime on your counter before juicing you get more juice out of it!)
  • 3-4 TBSP honey
  • 3 TBSP chopped mint
  • 1/2 small honeydew, cubed
  • 1/2 cantaloupe, cubed
  • 1 pint fresh strawberries, halved and hulled
  • 2 c. fresh pineapple or mango cubed
In a large bowl, stir together lime peel, juice, honey and mint until combined. Add honeydew, cantaloupe, strawberries and pineapple or mango. Toss to combine. Makes 8 servings.


Bon appetit! Oh! And feel free to make it your own. Just a few suggestions of other fruit you can add: watermelon, grapes, mandarin oranges, other citrus fruits...just whatever floats your boat!


[erin's star signature]

Thursday, May 6, 2010

Spicey Avocado, Fish & Black Bean Taco Salad


I found this recipe in one of my favorite books- Katie Brown's Weekends. It's a compilation of recipes, crafts, and home decor ideas. The thing I love about her recipes is that they're usually simple, and elegant. She's a caterer, among other things. This recipe is in a section where she has recipes from around the world: Morocco, France, China, and, of course, Mexico.

I made it for the first time tonight, and knew that it would be a hit. As I was snapping shots of the finished product Don couldn't resist eating. Between shots I asked him how it was.

"S'good."
"You like it?" I coax.
"Yeah."
"Well great," I exclaim as I take my last picture. "Let's eat!"
"I'm already done."

I only took three pictures, and I it probably took only a minute or two. So, these little babies are pretty good. And if you're not a fish taco fan, you might want to change your mind. Fish tacos should be grouped in a whole different food group from your everyday fish, because you don't really even realize that you're eating fish. Let me put it this way: I have a sister to abhors anything remotely fishy, and she loves fish tacos. In fact, she's the one who introduced me to the whole concept. Funny, huh? Of course this is taco salad, but it's pretty much a variation on a theme.

Here's the recipe. It's a nice, fast dinner.

Ingredients:
  • 2 lbs. cod
  • 1 TBSP chili powder
  • 2 tsp brown sugar
  • 1/2 tsp salt
  • 1/2 tsp pepper
  • olive oil for sauteing
  • 1 cup salsa
  • juice of 2 limes
  • 1/2 can black beans, rinsed and dried
  • 2 green onions, thinly sliced
  • 1/4 cup chopped cilantro
  • 1 avocado, pitted and diced
  • corn tortillas
  • 3 cups shredded lettuce
  • sour cream (optional)
Rinse the fish and pat it dry. Set aside. In a bowl, combine the chili powder, brown sugar, and salt and pepper. Rub the mixture into the fish on both sides.

Heat a little oil in a large skillet. Saute the fish until it flakes easily. Remove from heat. Break the fish into large chunks.

In a bowl, combine the salsa, lime juice, black beans, green onions, cilantro, and avocado. Warm the tortillas in the oven or on the stove top over a low flame. Divide the fish and bean mixture equally among the tortillas. Top with lettuce and, if desired, sour cream.


Your taco salad will never be the same.


Yum.
[erin's star signature]

Friday, February 19, 2010

French Onion Soup

I have a similar conversation with Don every time I make this soup, and it goes something like this:

"I thought you didn't like onions." Don gives me a quizzical look.
"I like this."

I really don't like onions a whole lot, well, let me rephrase that, I don't like uncooked onions. But this doesn't fall underneath that. And since all of the onion flavor melds with the broth and you don't have that strong onion taste burning your tongue and making your breath stink for the next 24 hours, I make an exception. Besides, I'm mildly obessed with anything French related.
The best part about this soup?? It doesn't take a long time to make and is comprised of a small list of ingredients, and since I always have onions, I pretty much always have the ingredients for this soup. It's a wonderful thing to make when you don't feel like cooking. And I'm all about that.

Here's the recipe:

French Onion Soup
  • 2 TBSP butter
  • 2 cups thinly sliced yellow onions (2 large)
  • 4 cups beef broth
  • 2 TBSP dry sherry or dry white wine (optional)
  • 1 tsp Worcestershire sauce
  • Dash black pepper
  • 6 slices French bread, toasted
  • 1 cup shredded Swiss, Gruyere, ro Jarlsberg cheese (4 oz., I usually only have mozzarella in fridge)
In a large saucepan, melt butter, add onions. Cook covered, over medium-low heat for 8 to 10 minutes or until onions are tender and golden, stirring occasionally. Stir in broth, sherry (if desired), Worcestershire sauce, and pepper. Bring to boiling; reduce heat. Simmer, covered, for 10 minutes.
Meanwhile, sprinkle toasted bread with shredded cheese. Place bread under broiler until cheese melts and turns light brown. To serve, ladle soup into bowls and top with bread. I usually don't top with the bread, since I prefer to dip it.


Bon appetit!


[erin's star signature]

Monday, February 8, 2010

Best Ever Sugar Cookies


I just realized I've never put any cookies on here! With a blog name like mine, that's almost sacrilegious. Lucky for me it's almost Valentines. And if you're like me, sugar cookies with pink frosting go hand-in-hand with Valentines Day. (Don't worry Launi, your gestational diabetes will be over soon and we'll bake to our hearts delight!) Confession: I have the hardest time when it comes to sugar cookies. I can never seem to get them right. Either they're too brittle, or I didn't roll them out thick enough, or I mess up the frosting. But, I finally found a recipe that I love!! It's the kind-of recipe that makes people like me wonder how you did it, and if it's possible for someone under 60 who hasn't spent a huge chunk of their life in the kitchen to replicate. And the answer is yes! I don't know what it is about this recipe, if it's the double leavening with the baking soda and baking powder, on top of the 3 eggs that are added, but these beauties rise like you've put yeast in them. They also have a beautifully light and soft texture. I think that might be from the sour cream/sour milk that you add to them. Best of all--there's no fridge time, no chilling the dough overnight, or for a few hours, or at all! They are my one and only sugar cookie from now on. And I'm so happy that I found them, and can finally make peace with the sugar cookie world.
I actually got the recipe from a ward cookbook. Those people in Millville sure can cook! That's what I love about ward cookbooks. They're like little gems among the cookbook world. They're tried and true recipes, and usually not anything too fancy.

So, here is this gem of a recipe:

Ingredients:
  • 1 cup butter, softened
  • 2 cups sugar
  • 1 cup sour cream or 1 cup sour milk*
  • 3 eggs
  • 1 tsp baking powder
  • 1 tsp baking soda
  • 1 tsp salt
  • 4 to 6 cps flour (I used 5)
  • orange zest or lemon zest-optional
Cream butter and sugar together. Add eggs one at a time. Add cream/milk and dry ingredients, using only 4 cups of flour. Add vanilla. Gradually add just enough more flour to make it so you can roll out dough from a 1/4" to 1/3" thick on a floured surface. Cut with cookie cutter. Bake at 350 degrees for about 10 minutes on greased cookie sheet. Cookies will remain white.
*To make sour milk combine 1 cup milk with 1 TBS vinegar, and let sit for 5 minutes.

Plain, simple, easy. Frost with your favorite cream cheese, or butter cream frosting. Or whatever frosting floats your boat.


What is it about pink buttercream that makes me happy?? Probably nostalgia. The frosting that I used was from none other than the famous Magnolia cookbook. See? I told you I'd share. It's what compliments their famous vanilla cupcakes. It's actually not so much a buttercream frosting as it is an old fashioned confectioners' sugar and butter frosting. It's wonderful, and the trick is all in the mixing. You have to mix this baby for a good while before you get the right consistency. And for those of us without kitchen aids, it can be a lot of work, but it's worth it!

Magnolia's Vanilla Buttercream Frosting:
  • 1 cup (2 sticks) unsalted butter
  • 1/2 cup milk
  • 2 tsp. vanilla extract
  • 6-8 cups confectioners' sugar
Place the butter in a large mixing bowl. Add 4 cups of the sugar and then the milk and vanilla. On the medium speed of an electric mixer, beat until smooth and creamy, about 3-5 minutes. Gradually add the remaining sugar, 1 cup at a time, beating well after each addition (about 2 minutes), until the icing is thick enough to be of good spreading consistency. You may not need to add all of the sugar. If desired, add a few drops of food coloring and mix thoroughly. (Use and store the icing at room temperature because icing will set if chilled.) Icing can be stored in an airtight container for up to 3 days. **I halved this recipe and it was just enough for all of the cookies.


[erin's star signature]

Tuesday, January 19, 2010

Seven Year Granola


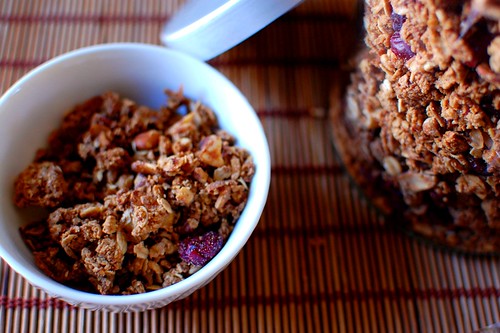
I have a confession to make: this granola isn't mine. I actually got the recipe off of the Traveler's Lunchbox blog. It took her seven years to refine it, thus the name. The difference between this and other granola is the use of oat flour and brown sugar, the combination of which produces a super light and flaky granola. I love this granola, even though I'm not really a granola person. But I tried this recipe because it made me feel nostalgic, my mother would always make granola for us. Anyway, I ended up making it for an entire summer a couple years ago. It's easy to make, and mixes up pretty quick, and it's healthy. And did I mention it's economical as well?? It lasts us at least a good week, and that's with us eating it like there's no tomorrow!
Anyway, I forgot about this granola until I stumbled across the recipe last week. I thought I'd share. Just a note before you read the recipe, if you don't have quick oats and oat flour, no prob! Just do what I do and for quick oats blend regular rolled oats in a food processor/blender until they're about half their normal size. Do the same for oat flour until it reaches a flour stage.

Seven Year Granola:

  • 3 cups quick oats
  • 2 cups oat flour
  • 3 cups nuts/seeds (I like to use a mix of almonds and walnuts, but play with it!)
  • 1 cup coconut (optional, I actually added this)
  • 1 cup brown sugar, packed
  • 1/2 cup unsalted butter (I used salted, it's all I had)
  • 2 tsp vanilla extract
  • 1 tsp ground cinnamon
  • 1/2 tsp ground cardamom
  • 1/4 tsp mace
  • 1 cup Craisins
Preheat oven to 300 degrees Fahrenheit. In a large bowl combine the oats, oat flour, nuts and/or seeds. In a microwave-safe bowl or a saucepan combine the brown sugar, butter and water and heat just until the butter has melted and the mixture is bubbly (about 1 min. for the microwave). Stir everything together until smooth, then stir in the salt, vanilla and spices. Pour this mixture over the oats and nuts, stirring everything well to coat. Let stand for about 10 minutes.
Spread the mixture out on a large baking sheet, separating it into irregular clumps with your fingers, and allowing space between the clumps for the hot air to circulate. Slide into the middle of the oven and bake for 25-30 minutes, or until the top is golden brown. Remove from the oven and stir, gently breaking up the mixture into small-to-medium sized clumps. Return to the oven and bake another 15 minutes or so before stirring again. Repeat the bake-and-stir until the mixture is a uniform golden brown and completely dry; this usually takes 1-1 1/2 hours (for me it took 1 1/4). Add Craisins, if using. Cool completely before using. Store in a covered container at room temperature. Serve with milk or yogurt and fruit as desired.


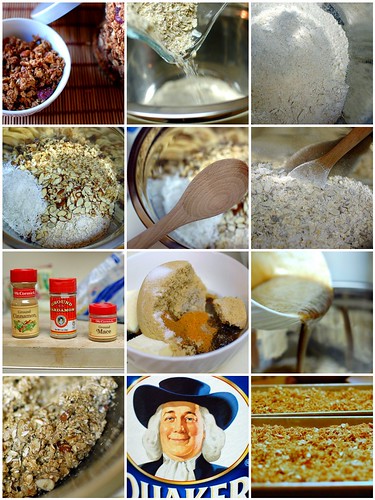
1. Finished Product, 2. Adding quick oats, 3. Oat flour, 4. oats, coconut and nuts, 5. mixing oats, nuts and coconut, 6. uniform mix, oat and more, 7. spices, 8. unmelted spice mix, 9. Melted spice and sugar mix, 10. Oats & etc. mixed with brown sugar mix, 11. the Quaker Oat Guy, 12. ready to bake granola

Wednesday, January 13, 2010

Holly Hipps' Sweet Rolls with Walnuts and Clementine


This recipe, unfortunately is not from Magnolia. But, this is the first cinnamon roll recipe that I mastered. My mother has a divine, decadent one from the Lion House that I inherited. But I'm scared of it. It requires dough hooks for an extremely sticky dough, which results in a heavenly, moist cinnamon roll. I used to make them perfectly, and then one day my world crashed down around me, and every time I made them they flopped. So, this is my standby.

Today, I made these rolls with the regular cinnamon-sugar filling. Then I added some alterations: coarsely chopped walnuts and some clementine juice and zest to cream cheese frosting. The frosting is typically more of an icing, but I'm a cream cheese fan. And I was the one making them. The result of my hard labor?
I ate three.
By myself.
And I don't regret it. I'm excited for breakfast so I can eat more. Don said they were, "awesome". Which is high praise. Especially since he's not a frosting freak like I am. Some times I don't know how we got together.

The thing that I like about this recipe is that Holly Hipps (a neighbor of my in-laws, and a baker to boot) has broken it down into a pretty idiot proof recipe (which I definitely needed until this last year before yeast and I became friends). Don almost didn't let me share this recipe, because it is held sacred in his family. It's that good. Did I mention that cinnamon rolls are fun to make? It's the grown-ups way of playing in the mud. I prefer to do everything by hand, stirring, kneading, spreading the butter, cinnamon sugar, etc. There are very few tools and clean-up needed that way. And it makes me feel like I'm five again, making mud pies. That's where it all started.

So, here it is:

Ingredients:

Dissolve:
  • 1/2 c. warm water
  • 2 TBSP dry yeast
  • 1 TBSP sugar
Melt together:
  • 1 1/2 c. water
  • 3/4 c. shortening
Mix:
  • 4 eggs, beaten
  • 3/4 c. sugar
  • 2 tsp salt
Add the cooled shortening mixture to the yeast mixture, You don't want to add it hot because you'll kill your little yeast friends. Then add that to the egg mixture. Blend well, and add 7 cups of flour. Knead several times, place in a greased bowl in a warm, draft free place. (I like to fill a glass 9" x 13" cake pan half full of the hottest water I can get out of the tap and place it on the bottom rack of the oven. Then I cover the greased bowl, with it's contents, with a dish towel and let it rise). Let double in size. You will know it is double the size when you stick your index finger in and it leaves an indentation in the dough. Punch down (my favorite part), roll out to about 1/2-1/4 inch flat in a rectangle shape. Soften one cube of butter, and spread with hands (or a pastry brush if you're a pansy) on the now rectangle dough. Make a cinnamon-sugar mixture (I guest-a-mate, but it works out, I did 3 TBSP of sugar to about a 1/2 tsp of cinnamon) and sprinkle THICKLY over the butter. There's nothing worse than bland cinnamon rolls. Sprinkle with coarsely chopped walnuts. Roll the long side to form a little cin-a-dough log. Then, (and this is my other favorite part), take a string and slip it underneath the log, then switch both strands from one hand to the other so that they are crossing, pull, and cut sections measuring about 1 inch wide. Place on buttered (because you're worth it) cookie sheet. Repeat with remaining dough. Let rise until double the size. Bake at 375 for 20 minutes (mine were a little less, ovens vary, so check on your rolls, if the smell done, they probably are).

Frosting:
  • 3 TBSP butter
  • 1 pkg. cream cheese, at room temperature
  • 2 to 3 cups of powdered sugar
  • about 1 TBSP fresh clementine juice (or to taste)
  • 1 to 2 tsp(s) of clementine zest
Clementine Frosting:

Combine butter and cream cheese, beat with a mixer until light and fluffy. Add sugar, one cup at a time until mixture reaches spreading consistency. Add juice and zest. The juice will change the consistency of the frosting, so you might need to add more sugar.

Alternate Icing:

  • 1/2 c. margarine/butter
  • 1 tsp. vanilla
  • 2 c. powdered sugar
Mix all ingredients and add enough canned milk until smooth. Frost over cooled sweet rolls.

Spread icing/frosting with a rubber spatula on cooled cinnamon rolls. Or, if you're like me, warm rolls since I can never wait until they cool to eat them, and I like the half-melted frosting look.
[erin's star signature]

Sunday, January 3, 2010

Aaaah, Magnolia

Look at what I got myself for my birthday.


I'm so happy. Magnolia. Or as, Lilly, my sister-in-law says, "Mongolia." (She gets the two mixed up sometimes. Even though one is a country and the other a flower. It's endearing, dearest Lilly.) I have been in love with the Magnolia Bakery in New York since I picked up a copy of the Reader's Digest four years ago and they were rated as one of America's top bakeries. Since then I have scoured the internet trying to find out top secret information about the bakery. How do they do their swirl? Are any of their recipes on the internet? Then, a mere half week ago I found this beautiful cookbook. It's what dreams are made out of. It has everything from ice cream to sweetbreads to cheese pies. Oh yes, cheese pies. I had to have it. Don't worry, I'll share. Although, the cookbook still doesn't show how to do that dang swirl.

[erin's star signature]